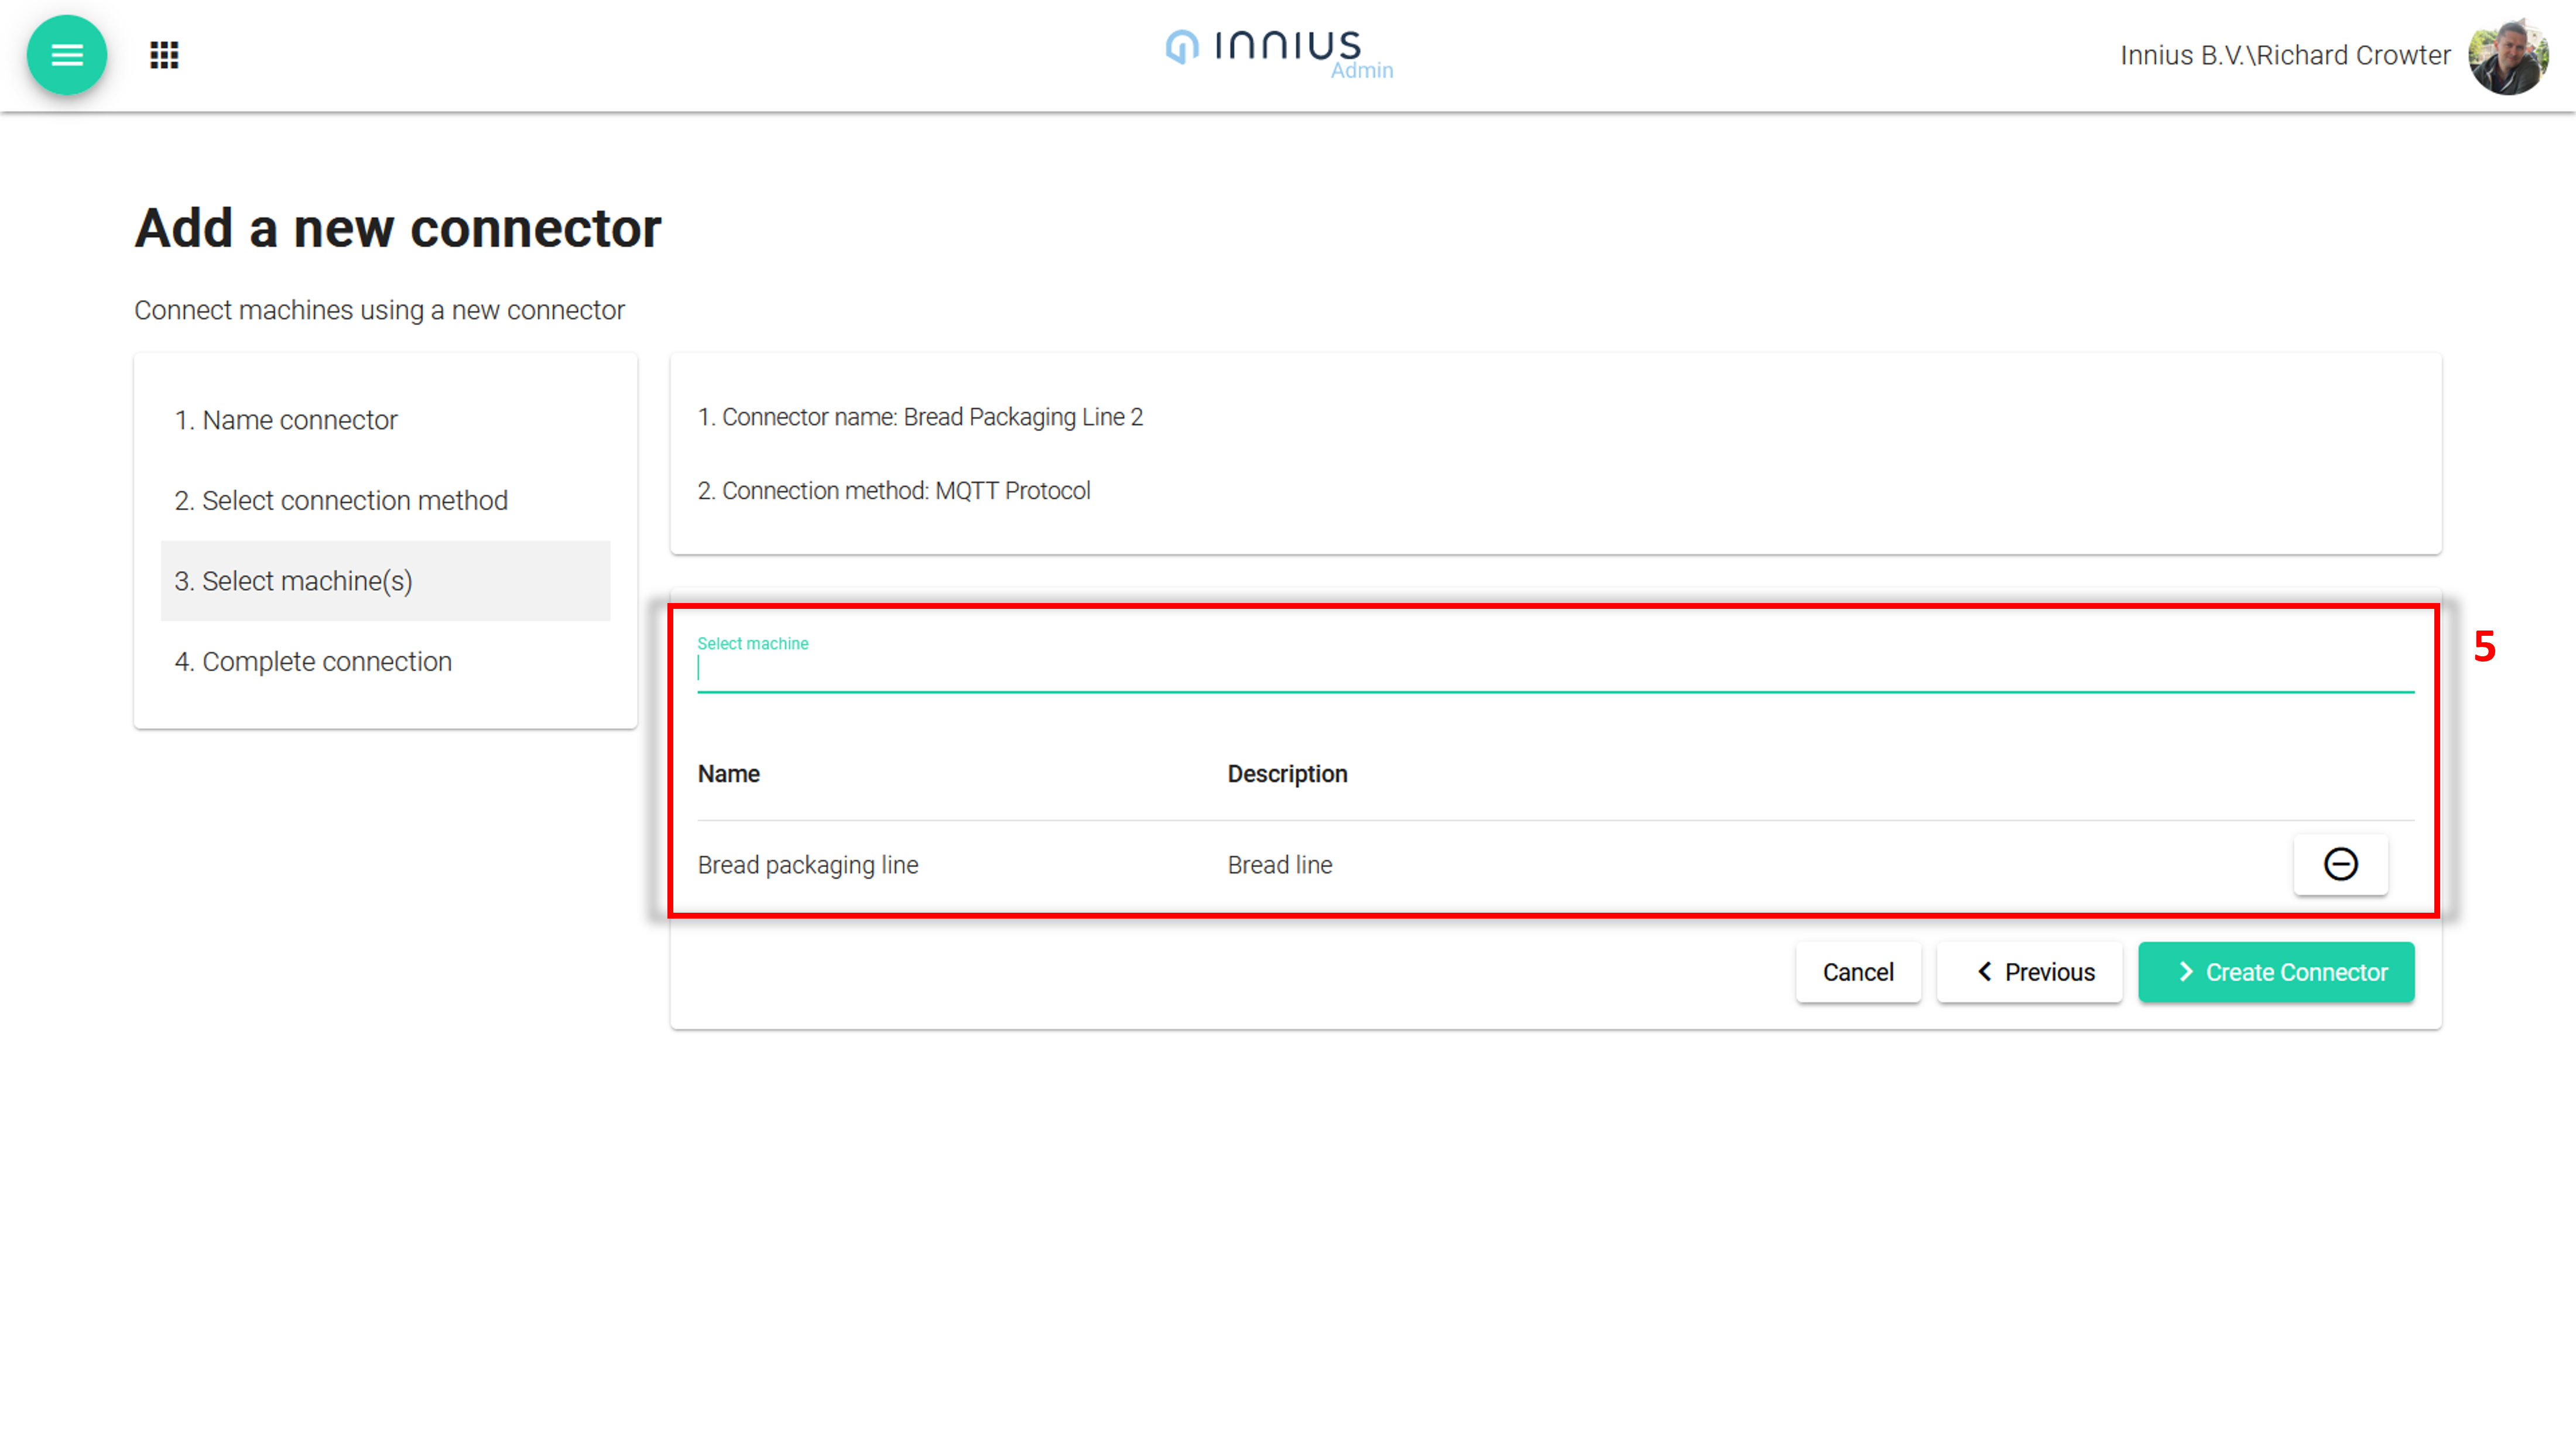
- The next step is to select the machines created in innius which will be connected through the connector (5). You can select multiple machines if applicable.
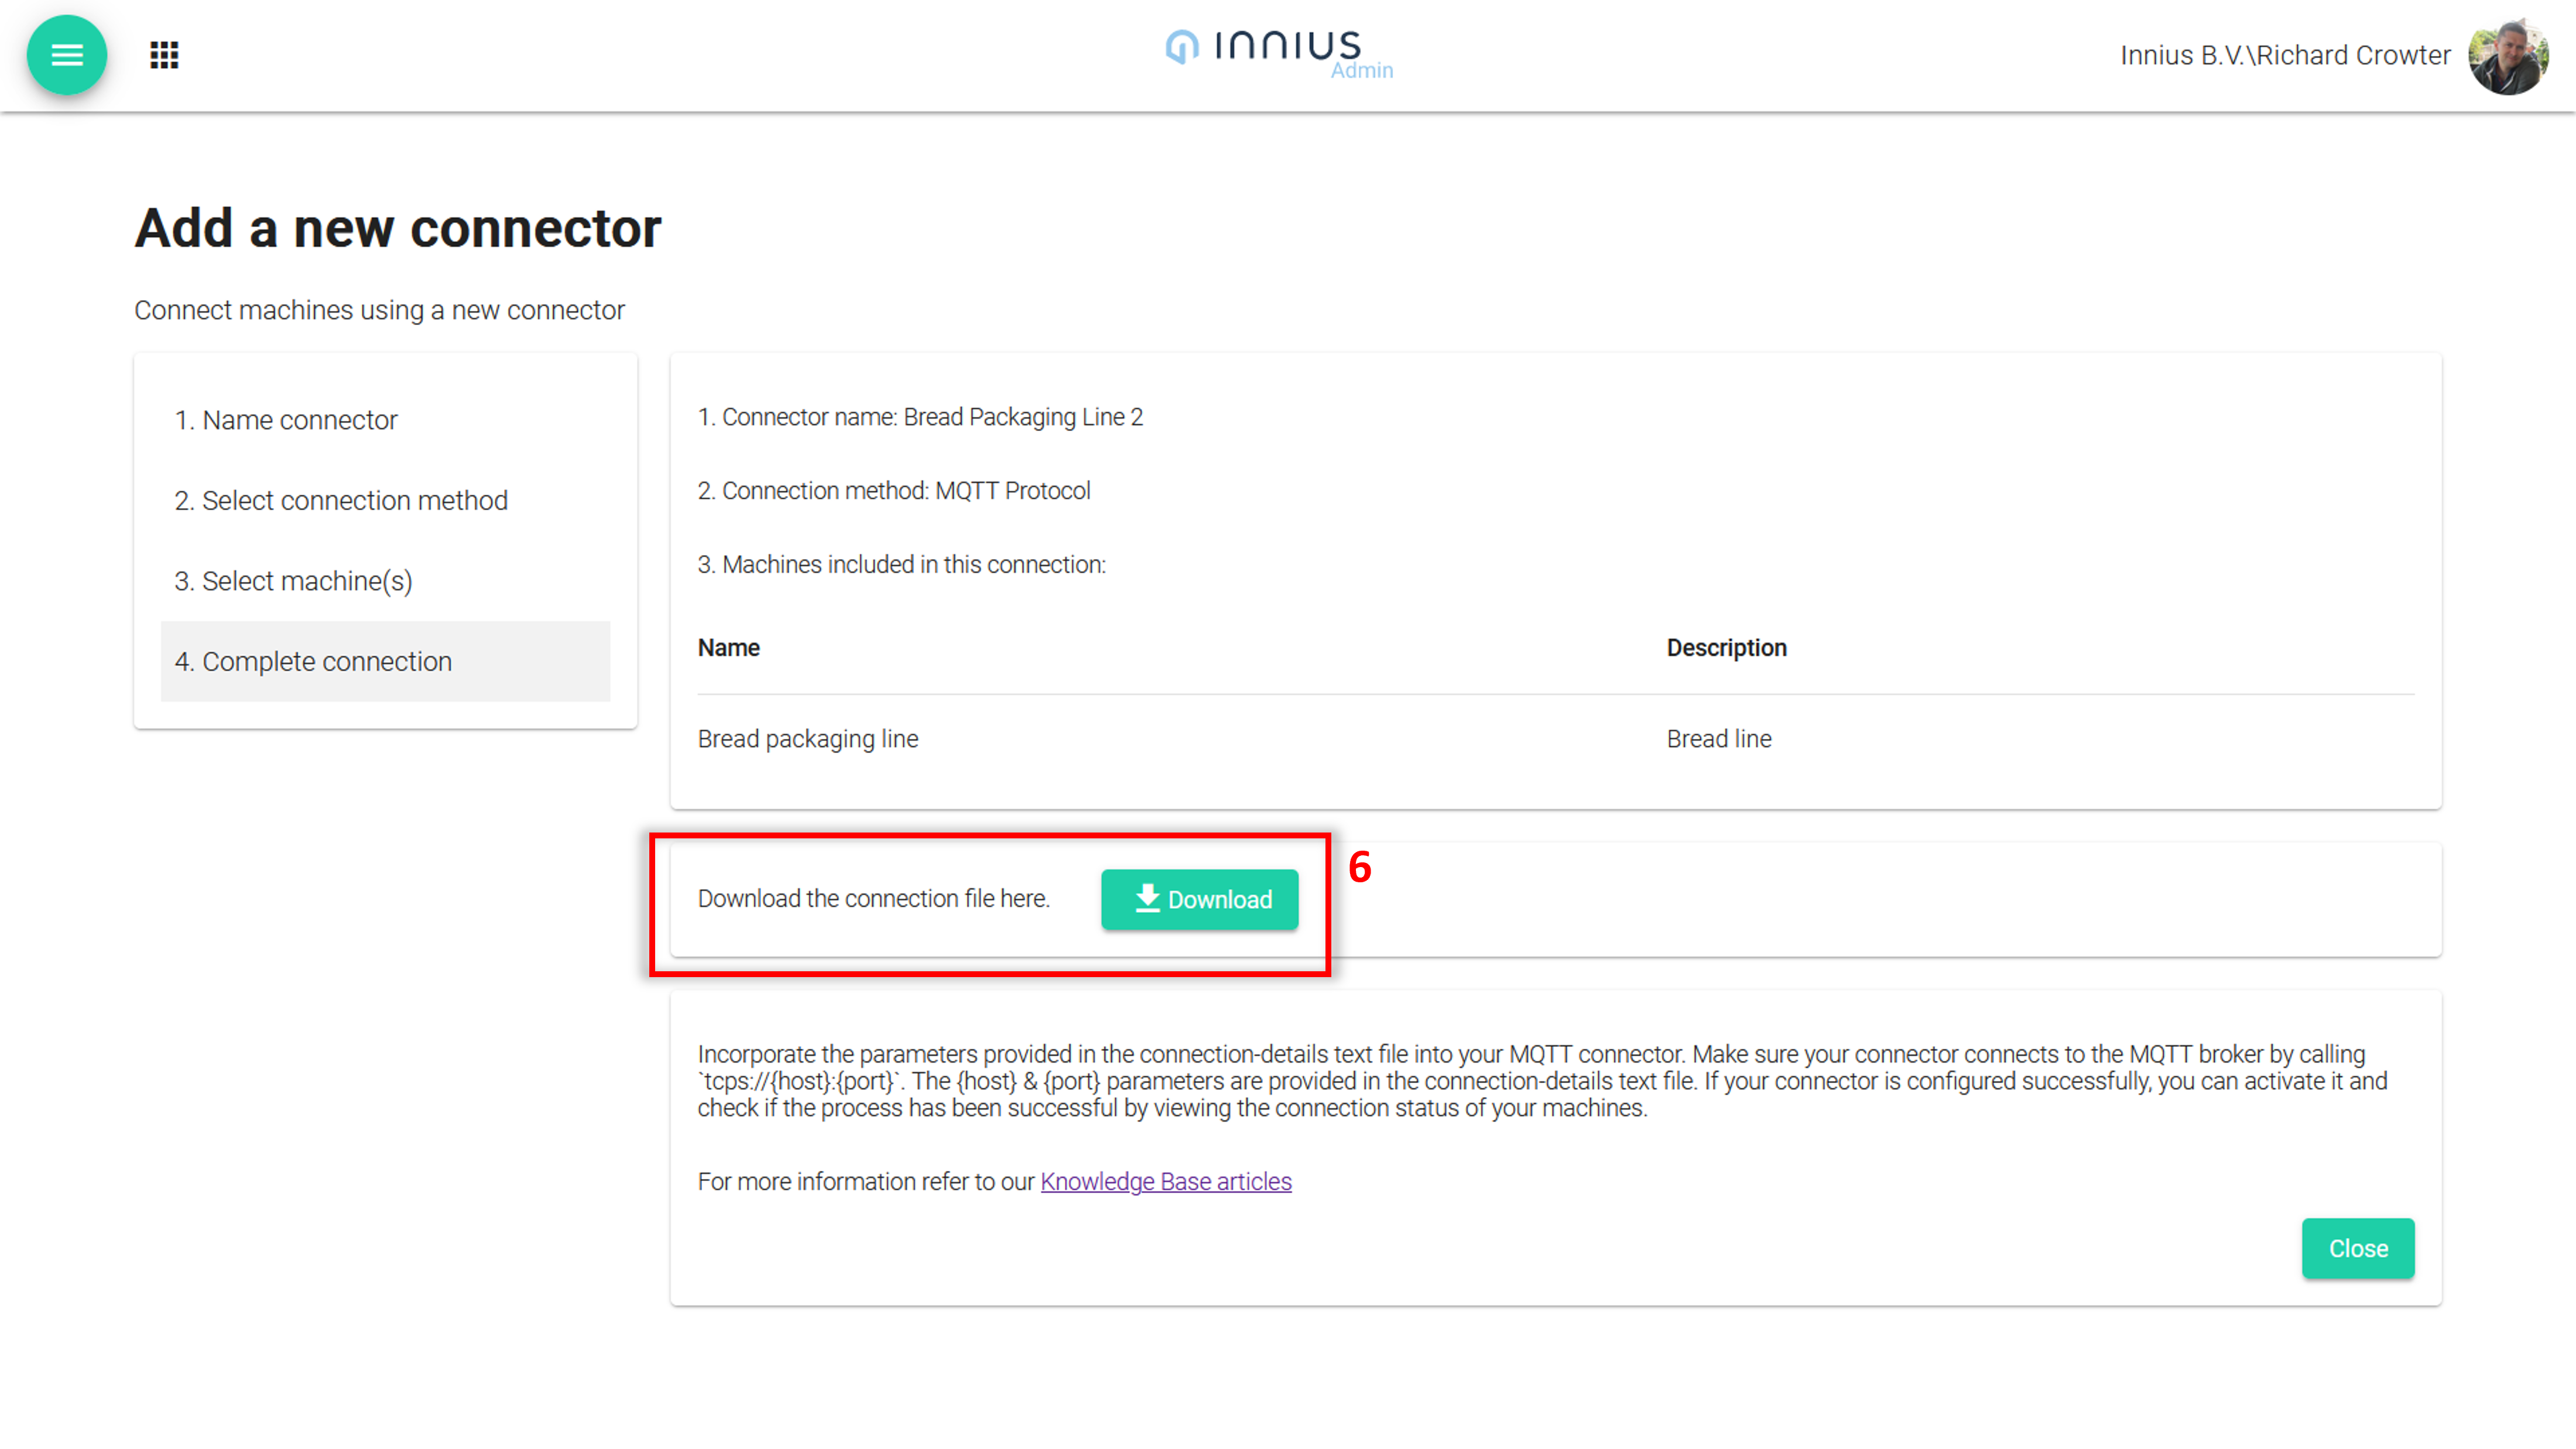
- Click on the "Create Connector" button, and the connector will be generated. In the next step you can download the connector.
- Click "Download" (6) to download the MQTT certificates, endpoint and MQTT topic.
Part 2: Configuring the MQTT Client
Step 1: Incorporate MQTT certificates, endpoint and topic into the MQTT client
Choose an MQTT client that is suitable for you. There are many
platforms that support MQTT communication, ranging from PLC compatible
software environments with GUI-based configurability (such as Productivity Suite), to low-coding platforms (such as n8n), to a custom-written program written in a coding language of your choosing (such as Python, Java, C++, or Golang).
An MQTT connection with innius is set up using mutual transport layer
security (TLS). TLS is an industry standard, so documentation and
instructions for configuring TLS in the programming language of your
choosing, should be readily available online.
This means that unique certificates are required to authenticate your
connection request. The certificates and the endpoint to connect to are
provided by innius.
Warning: The
certificates contain sensitive information and should not be shared
carelessly. Any party with access to these certificates will be able to
connect and publish to innius under your name.
An example client is provided here below, written in Golang. Here, we make use of the following mqtt package:
http://github.com/eclipse/paho.mqtt.golang
The aforementioned TLS configuration requires a *.cert.pem file, a *.private.key file and a root-CA.crt file:
tlsCert, err := tls.LoadX509KeyPair(
"path/to/cert/file.cert.pem", "path/to/private/key/file.private.key")
if err != nil {
	return err
}

certs := x509.NewCertPool()
caPem, err := ioutil.ReadFile("path/to/rootCA/file.crt")
if err != nil {
	return err
}
certs.AppendCertsFromPEM(caPem)
tlsConfig := &tls.Config{
	Certificates: []tls.Certificate{tlsCert},
	RootCAs:      certs,
}
- Your MQTT client must support the TLS standard:
opts := mqtt.NewClientOptions()
opts.SetTLSConfig(tlsConfig)
- The MQTT client must also be
configured with a client ID. Your unique client ID is provided in the
documents available for download on configuring your connector in the
innius Admin App.
opts.SetClientID("inniusConnectorID")
Note: the ID of the MQTT client should be exactly
the same as the client ID provided to you by innius upon creating your
connector in the innius Admin App. Failing to meet this criteria will
result in your connection being refused.
- Lastly, the innius endpoint needs to be inserted, which is the hostname of the MQTT broker:
opts.AddBroker("tcps://" + inniusHost + ":8883")
Note: It is important to prepend the inniusHost with
“tcps://” in the url scheme, indicating that a MQTT connection is
requested over a secure line. The inniusHost is the endpoint provided by
innius from the previous step. Lastly, “:8333” needs to be added to the
server to indicate that we want to connect on port “:8333”.
- A new MQTT client can now be created and connected to the Innius system:
client := mqtt.NewClient(opts)
token := client.Connect()
token.Wait()
if err := token.Error(); err != nil {
	log.Fatal(err)
}
- The new MQTT client tries to connect, and waits for a CONNECT
response from the innius platform. If a connection is refused, you might
receive errors like
network error, EOF, or not connected. The particular error message will depend on the MQTT package and programming language.
Step 2: Publishing data to Innius
After the MQTT client is successfully
set up, data can be published to the innius system. First, the payload
of the published message needs to be defined. The MQTT message payload
must conform to the our MQTT JSON format. Note that any deviation from
this format can cause the messages to be dropped.
- The expected MQTT JSON format:
{
  "events":
  [
    {
      "name": "",
      "value": 0,
      "time_unix": 0
    }
  ]
}
type Payload struct {
Events []Event `json:"events"`
}
type Event struct {
Name string `json:"name"`
Value interface{} `json:"value"`
Time int64 `json:"time_unix"`
}
It is possible to insert multiple sensor events into one publish request. Each sensor event has a sensor name, which should equal the physical ID of the sensor in the innius Admin App.
Furthermore, an event has a value, which can be of type string or a
number but in both cases must represent a number, and a timestamp as a
unix number.
Warning: Timestamps in milliseconds are not supported.
- An example of a correct payload can be seen below:
payload := Payload{
	[]Event{
		{
			Name:      "sensor physical ID",
			Value:     12.05,
			Time:      1683895915,
		},
		{
			Name:      "sensor physical ID2",
			Value:     3.14,
			Time: 	   1683895915,
		},
	},
}

payload, err := json.Marshal(events)
if err != nil {
	log.Fatal(err)
}
- This will result in a marshaled JSON string with the following format:
{
  "events": [
    {
      "name": "sensor physical ID",
      "value": 12.05
      "time_unix": 1683895915
    },
    {
      "name": "sensor physical ID2"
      "value": 3.14
      "time_unix": 1683895915
    }
  ],
}
- The events are sent to an MQTT topic. This topic is provided in the
files available for download when creating a connector in the innius
Admin App.
topic := "myInniusTopic"
- Next, make sure that your client does not publish events with
message-retention enabled. Innius does not support MQTT message
retention and publish requests will be denied if message retention is
enabled.
messageRetention := false
- Then, the quality of service (qos) of the message is set, which should be equal to 0. This means that message are sent at most once. Other values are not supported by Innius, and will be ignored when sent in the message:
qos := 0
- Finally, the payload can now be sent to the Innius platform:
token := client.Publish(topic, qos, messageRetention, payload)
token.Wait()
if err := token.Error(); err != nil {
  fmt.Println(err)
}
- If a publish request is accepted, no error will be returned.
- Check in the innius Admin app that the machine status has changed to 'Connected' (7)
- Check in the innius Insight app that the sensor values are coming in.
- Congratulations! Your machine is connected to innius!
Further notes:
Note:
When publishing messages, make sure that published messages are not retained, and are set at most once.
Limits:
Regarding MQTT actions, only CONNECT and PUBLISH actions are
supported by the Innius platform. There are no permissions for any other
MQTT actions (such as SUBSCRIBE), and these are not be recognized.
Actions:
Innius does not support sensors with a rate higher than 1 event per
second. Therefore, it is only possible to publish one MQTT message per
second per MQTT client to the topic, and an MQTT message cannot have
sensor events from the same sensor and with the same timestamp.